Overview
All Cryostats used in the LEM sample environment are of the "flow" type, that is: a dewar with liquid helium is permanently connected and a pumping system sucks the liquid helium or cold helium gas through the system. An additional heating system, connected to the LakeShore340 temperature controller supplies a small amount of heat for final temperature stabilization. The amount of liquid or cold gas should be just enough to reach the temperature, too much will -if possible- be evaporated by the heater. The so-called KontiCryo's have one circuit for the cold gas, the LowTemp type have two circuits. In the latter, there is a small vessel, called phaseseparator, inside the Cryo the deal with a liquid helium flow. Hence, the LowTemp's can reach a lower temperature (2 K), but are more difficult to operate and regulate.
In all cases, care has to be taken that no moisture or air enters the Cryo while it is cold. An immediate block (freezing) will inhibit the Cryo from working and will cost you an hour or more to solve.
ALWAYS WEAR PROTECTING GLOVES WHEN WORKING WITH CRYOGENIC LIQUIDS
Cool down Sample Cryo
Connection between the He-dewar and the Cryo is made through a transferline, that has in general a needle valve to adjust the input flow. The mechanics of this valve is at the lower end of the transferline, and thus in the cold. Take the following steps:
- Open the needlevalve of the transferline fully (100 % on the electric ones, 3 turns on the manual one).
-
Close the recovery valve of the dewar, this allowes for pressure built up.
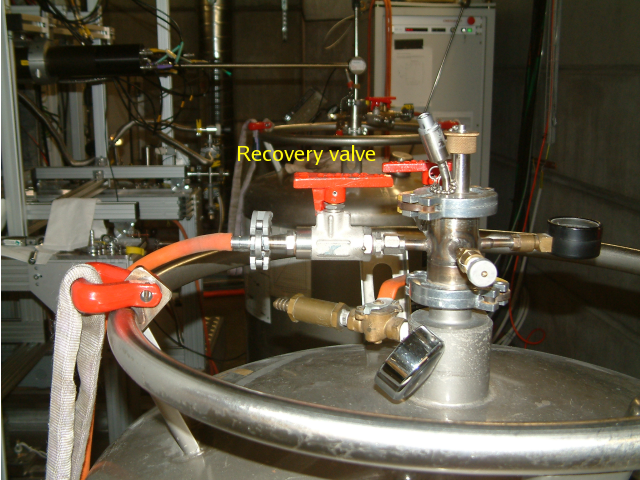 Red Recovery-line-valve on the He dewar
 - SLOWLY insert the transferline into the dewar until you see the pressure increase (to about 0.1-0.2 bar).
- Pull back the transferline by 5 cm. Now there is pressure in the dewar, and thus the transferline will be flushed with He gas.
- Wait until you can feel (best with your cheek) the flow of cold gas coming out of the transferline.
- DO NOT INHALE THE HE GAS, SUFFOCATION HAS BEEN REPORTED
- Insert the transferline fully into the dewar until it is a few centimeter above the bottom. Never empty a dewar completely, it is difficult and costly to fill a warm dewar.
- If the pressure gets too high (> 0.3) just open the recovery line a while.
- If the gas from the top of the transferline gets too cold (ice forming) just close the top of the transferline with your finger. If you burn your finger, you were too late.
-
Once the transferline is in the dewar, you can insert it into the Cryo. Turn the brass nut 180 degrees counterclockwise, remove the aluminum plug and insert the transferline fully until it stocks.
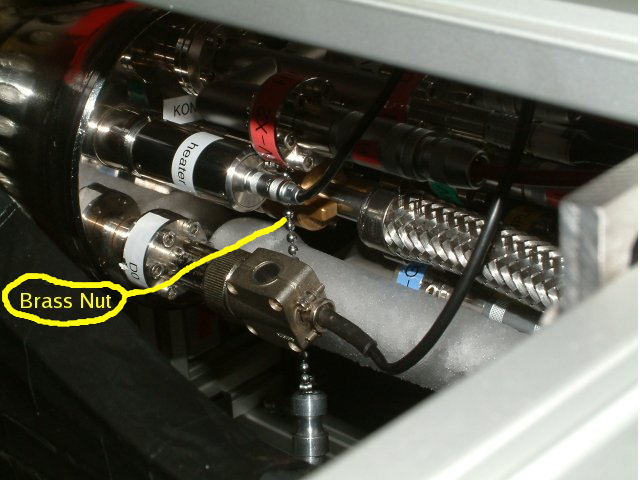 Brass nut holding the transferline in KontiCryo
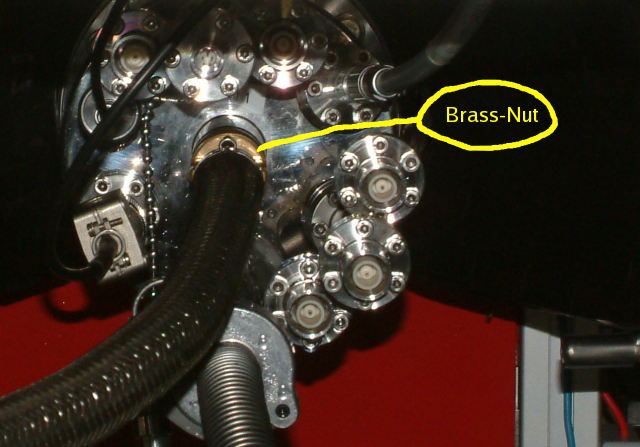 Brass nut holding the transferline in KontiCryo
 - Fasten the brass nut (clockwise).
-
Close the pump bypass, switch on the pump by plugging the powercord and open the flow bypass.
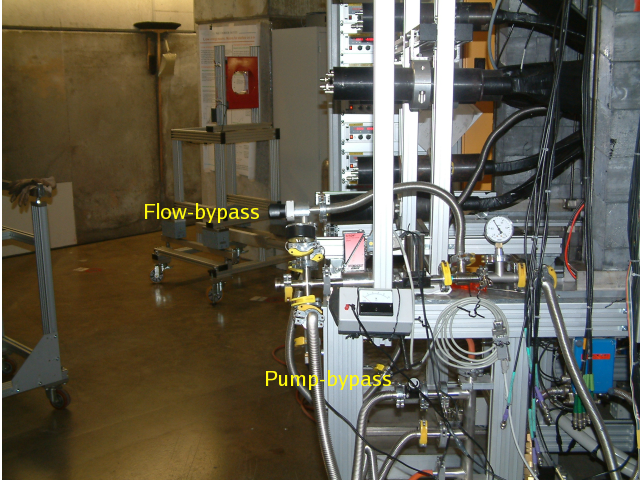 Location of Bypass Valves
 - Open the recovery line of the dewar.
- Set the Bronkhorst flow regulator to some high demand value (e.g. 10,000).
- Close the flow bypass. Now the measured flow should slowly increase. Bear in mind that the viscosity of He gas is strongly temperature dependent, as long as the transferline is at roomtemperature, the flow will be small.
- The easiest way to reach the correct temperature where the measurement should start is to let AutoRun do the job by running a .lar file with TEMP <value>, <accuracy>, <timeout>, <ramp>. see e.g. set10K.lar. Otherwise, if you are ill advised to do it manually, wait until the correct temperature is reached, adjust the flow and the needle valve and try to reach stability.
-
Nevertheless, if you are interested in the lowest temperature possible with a KontiCryo then
- leave the Cryo at 10 K for more then an hour.
- for the real lowest temperature open the flow bypass, else set the Broncos demand value to 32,000.
- Set the demand temperature low, e.g. 1 K.
- Adjust the needlevalve SLOWLY until the pressure is 0.4 bar with open bypass or 0.5 bar with closed bypass.
- For the LowTemp's one is referred to their respective manuals.
Warm-up the Cryo.
-
The easiest way to warm the Cryo is to submit the WARMUP command in
AutoRun
. If you are ill advised to do everything manually then
- Close the vacuum valves BPVX and BPVY.
- Ramp down the high voltage on the sample, the grids and on the ring anode.
- Set the Bronkhorst flow demand to zero (and eventually close the flow bypass valve).
- Set the demand temperature to 300 K. If the LS340 is not in ZONE mode, set the heater range to 5.
- Wait until room temperature has been reached.
- Switch off the He pump.
- Open the pump bypass valve.
- Close the needlevalve on the transferline.
- Remove the transferline from the Cryo by turning the brass nut 180 degrees counter clockwise, replace the transferline by the aluminum plug and fasten the brass nut.
- Remove the transferline from the dewar.
- If you want to open the sample chamber (e.g. for sample change) follow the directions in the sample change manual.
Dewar Change
- Close the vacuum valves BPVX and BPVY.
- Ramp down the high voltage on the sample, the grids and on the ring anode.
- Set the Bronkhorst flow demand to zero (and eventually close the flow bypass valve).
- Set the demand temperature to anything larger or equal 20 K.
- Wait until that temperature has been reached.
- Open the main valve of the He-gas bottle.
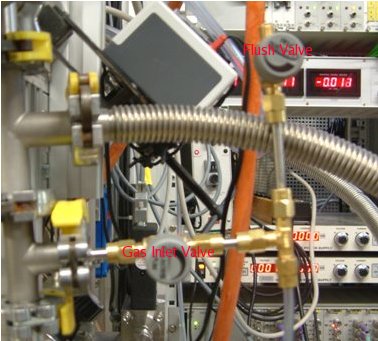
- Open for 20 seconds the flush valve (see photo) of the gas-inlet.
- Open the He-gas inlet valve
- Wait untill the pressure shows > 1.2 barr.
- Close the needlevalve on the transferline.
- Remove the transferline from the Cryo by turning the brass nut 180 degrees counter clockwise, replace the transferline by the aluminum plug and fasten the brass nut.
- Remove the transferline from the empty dewar.
- Gently dry and warm the transferline with tissues and a hairdryer.
- Open the needlevalve of the transferline fully (100 % on the electric ones, 3 turns on the manual one).
- Close the recovery valve of the full dewar, this allowes for pressure built up.
- SLOWLY insert the transferline into the full dewar until you see the pressure increase (to about 0.1-0.2 bar).
- Pull back the transferline by 5 cm. Now there is pressure in the dewar, and thus the transferline will be flushed with He gas.
- Wait until you can feel (best with your cheek) the flow of cold gas coming out of the transferline.
- DO NOT INHALE THE HE GAS, CASES OF SUFFOCATION HAVE BEEN REPORTED
- Insert the transferline fully in the dewar until it is a few centimeter above the bottom. Never empty a dewar completely, it is difficult and costly to fill a warm dewar.
- If the pressure gets too high (> 0.3) just open the recovery line a while.
- If the gas from the top of the transferline gets too cold (ice forming) just close the top of the transferline with your finger. If you burn your finger, you were too late.
- Once the transferline is in the dewar, you can insert it into the Cryo. Turn the brass 180 degrees counterclockwise, remove the aluminum plug and insert the transferline fully until it stocks.
- Fasten the brass nut (clockwise).
- Close the gas-inlet, and open the flow bypass.
- Open the recovery line of the dewar.
- Close the main valve of the He bottle.
- Set the Bronkhorst flow regulator to some high demand value (e.g. 10,000).
- Close the flow bypass. Now the measured flow should slowly increase. Bear in mind that the viscosity of He gas is strongly temperature dependent, as long as the transferline is at roomtemperature, the flow will be small.
- The easiest way to reach the correct temperature where the measurement should start is to let AutoRun do the job by running a .lar file with TEMP <value>, <accuracy>, <timeout>, <ramp>. see e.g. set10K.lar. Otherwise, if you are ill advised to do it manually, wait until the correct temperature is reached, adjust the flow and the needle valve and try to reach stability.
-
Nevertheless, if you interested in the lowest temperature possible with a KontiCryo then
- leave the Cryo at 10 K for more then an hour.
- for the real lowest temperature open the flow bypass, else set the Bronkhorst demand value to 32,000.
- Set the demand temperature low, e.g. 1 K.
- Adjust the needlevalve SLOWLY until the pressure is 0.4 bar with open bypass or 0.5 bar with closed bypass.
- For the LowTemp's one is referred to their respective manuals.
This latter part of the manual is subject to changes when improvements are made with the gashandling system.