 Utilities - Top - Data format
mhttpd is the Midas Web Server. It provides Midas DAQ control through the web using any web browser.
This daemon application has to run in order to allow the user to access from a Web browser any Midas experiment running on a given host. Full monitoring and "Almost" full control of a particular experiment can be achieved through this Midas Web server. The color coding is green for present/enabled, red for missing/disabled, yellow for inactive. It is important to note the refresh of the page is not "event driven" but is controlled by a timer (see Config- button). This mean the information at any given time may reflect the experiment state of up to n second in the paste, where n is the timer setting of the refresh parameter. Its basic functionality are:
Each section is further described below:
mhttpd requires as argument the TCP/IP port number in order to listen to the web based request.
>mhttpd -p 8081 -D
-[Experiment/Date] Current Experiment, current date.
-[Action/Pages buttons] Run control button, Page switch button. At any web page level within the Midas Web page the main status page can be invoked with the <status> button.
    odbedit
    mkdir Script
    cd Script
    mkdir doit
    cd doit
    create string cmd
    ln "/runinfo/run number" run
    create string dest
    set dest /dev/hda
[Version >= 1.8.3 Alias Hyperlink] This line will be present on the status page only if the ODB tree /Alias. The distinction for spawning a secondary frame with the link request is done by default. For forcing the link in the current frame, add the terminal charater "&" at the end of the link name.
   odbedit
   ls
   create key Alias
   cd Alias
   ln /Equipment/Trigger/Common "Trig Setting"
   ln /Analyzer/Output "Analyzer"

   create key "Alias new window"                     <-- Version < 1.8.3
   cd "Alias new window"
   ln /equipment/Scalers/Variables "Scalers Var"

  or
   cd Alias
   ln /Equipment/Trigger/Common "Trig Setting&"      <-- Version >= 1.8.3
The title of each field is taken from the ODB key name it self. In the case this label has a poor meaning and extra explanation is required, you can do so by creating a new ODB tree under experiment Parameter Comments/ . Then by creating a string entry named as the one in Edit on Start- you can place the extra information relative to that key (html tags accepted).
This "parameter comment" option is available and visible ONLY under the midas web page, the odbedit start command will not display this extra information.
[local:midas:S]/Experiment>ls -lr
Key name                        Type   #Val  Size  Last Opn Mode Value
---------------------------------------------------------------------------
Experiment                      DIR
    Name                        STRING  1     32    17s  0   RWD  midas
    Edit on Start               DIR
        Write data              BOOL    1     4     16m  0   RWD  y
        enable                  BOOL    1     4     16m  0   RWD  n
        nchannels               INT     1     4     16m  0   RWD  0
        dwelling time (ns)      INT     1     4     16m  0   RWD  0
    Parameter Comments          DIR
        Write Data              STRING  1     64    44m  0   RWD  Enable logging
        enable                  STRING  1     64    7m   0   RWD  Scaler for expt B1 only
        nchannels               STRING  1     64    14m  0   RWD  <i>maximum 1024</i>
        dwelling time (ns)      STRING  1     64    8m   0   RWD  <b>Check hardware now</b>

[local:midas:S]Edit on Start>ls -l
Key name                        Type   #Val  Size  Last Opn Mode Value
---------------------------------------------------------------------------
Write Data                      LINK    1     19    50m  0   RWD  /logger/Write data
enable                          LINK    1     12    22m  0   RWD  /sis/enable
number of channels              LINK    1     15    22m  0   RWD  /sis/nchannels
dwelling time (ns)              LINK    1     24    12m  0   RWD  /sis/dwelling time (ns)
If the ODB is Write protected, a first window will request the web password.
Since version 2.0.0, Elog comes in two flavors, i.e Internal Elog where the Elog is built in the mhttpd Midas web interface, or External Elog where the Elog runs independently from the experiment and mhttpd as well. While the internal doesn't requires any setup, the latter requires a proper Elog installation which is fully described on the Elog web site. The External Elog implementation requires to have a dedicated entry in the ODB following the code below. It requires also to have the package Elog previously installed and properly configured. Once the ODB entry is existant, the internal ELOG is disabled.
The format of the message log can be written in HTML format.
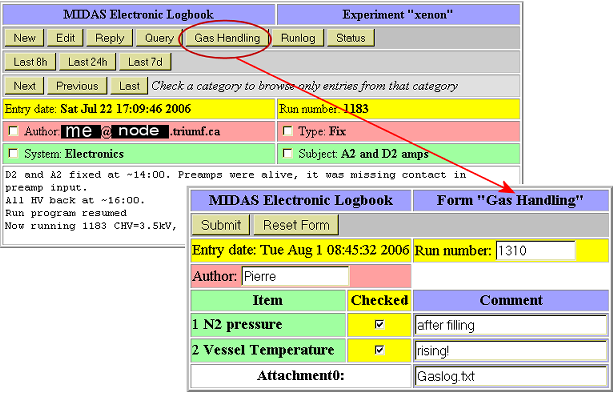
[local:myexpt:Running]/>cd /Elog/
[local:myexpt:Running]/Elog>mkdir Forms
[local:myexpt:Running]/Elog>cd Forms/
[local:myexpt:Running]Forms>mkdir "Gas Handling"
[local:myexpt:Running]Forms>cd "Gas Handling"
[local:myexpt:Running]Gas Handling>create string "N2 Pressure"
String length [32]:
[local:myexpt:Running]Gas Handling>create string "Vessel Temperature"
String length [32]:
[local:myexpt:Running]Gas Handling>ls
N2 pressure
Vessel Temperature
[local:myexpt:Running]Gas Handling>
[local:xenon:Running]Gas Handling>create string Attachment0
String length [32]: 64
[local:xenon:Running]Gas Handling>set Attachment0 Gaslog.txt

It's installation requires requires several steps described below.
  # This is a simple elogd configuration file to work with Midas
  # $Id: elogd.cfg 3218 2006-08-01 23:39:53Z ritt $

  [global]
  ; port under which elogd should run
  port = 8081
  ; password file, created under 'logbook dir'
  password file = elog.pwd
  ; directory under which elog was installed (themes etc.)
  resource dir = /elog_installation_dir
  ; directory where the password file will end up
  logbook dir = /myexpt/logbook
  ; anyone can create it's own account
  self register = 1
  ; URL under which elogd is accessible
  url = http://ladd00.triumf.ca:8081
  ; the "main" tab will bring you back to mhttpd
  main tab = Xenon
  ; this is the URL of mhttpd which must run on a different port
  main tab url = http://NodeA:8080
  ; only needed for email notifications
  smtp host = your.smtp.host
  ; Define one logbook for online use. Severl logbooks can be defined here
  [MyOnline]
  ; directory where the logfiles will be written to
  Data dir = /myexpt/logbook
  Comment = My MIDAS Experiment Electronic Logbook
  ; mimic old mhttpd behaviour
  Attributes = Run number, Author, Type, System, Subject
  Options Type = Routine, Shift Summary, Minor Error, Severe Error, Fix, Question, Info, Modification, Alarm, Test, Other,
  Options System = General, DAQ, Detector, Electronics, Target, Beamline
  Extendable Options = Type, System
  ; This substitution will enter the current run number
  Preset Run number = $shell(odbedit -e myexpt -h NodeA -d Runinfo -c 'ls -v \"run number\"')
  Preset Author = $long_name
  Required Attributes = Type, Subject
  ; Run number and Author cannot be changed
  Locked Attributes = Run number, Author
  Page Title = ELOG - $subject
  Reverse sort = 1
  Quick filter = Date, Type, Author
  ; Don't send any emails
  Suppress email to users = 1
NodeB:~>/installation_elog_dir/elogd -c elogd.cfg -x
NodeA:~>mhttpd -p 8080 -D
   NodeX:> odbedit -e myexpt -h NodeA
   [NodeX:myexpt:Running]/>cd elog
   [NodeX:myexpt:Running]/Elog>create string Url
   String length [32]: 64
   [NodeX:myexpt:Running]/Elog>set Url http://NodeB:8081/MyOnline
   [NodeX:myexpt:Running]
   [NodeX:myexpt:Running]/Elog>create string "Logbook Dir"
   String length [32]: 64
   [NodeX:myexpt:Running]/Elog>set "Logbook Dir" /myexpt/logbook

   [NodeX:myexpt:Running]/Elog>ls
Logbook Dir                     /home/myexpt/ElogBook
Url                             http://NodeB:8081/MyOnline
NodeB:~>/installation_elog_dir/elogd -c elogd.cfg -x -D
   NodeB:~> cp internal/elog_logbook/*.log /myexpt/logbook/.
   NodeB:~> cd /myexpt/logbook
   NodeB:~> /installation_elog_dir/elconv
The task name hyperlink pops a new window pointing to the ODB section related to that program. The ODB structure for each program permit to apply alarm on the task presence condition and automatic spawning at either the begining or the end of a run.
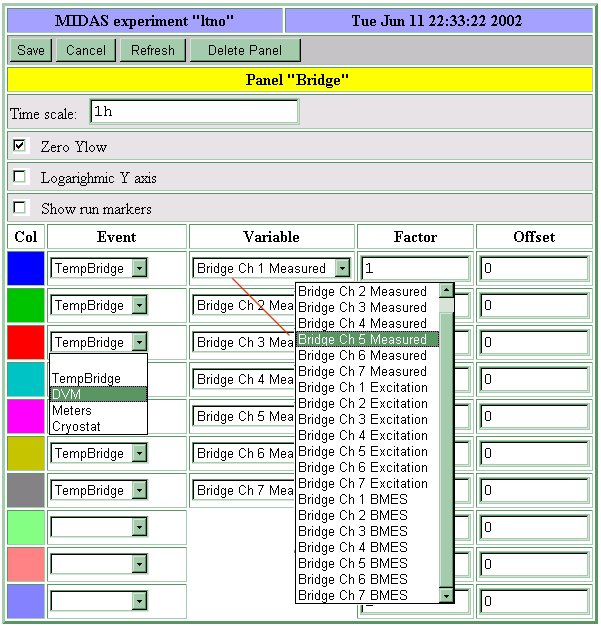
The configuration options for a given panel consists in:
This custom web page provides to the user a mean of creating a secondary personal web page activated within the standard Midas web interface. This custom page can contain specific links to the ODB and therefore present in a more compact way the essential parameter of the controlled experiment. Two mode of operations are available:
The access to the ODB field is then possible using specific HTML tags:
The insertion of a new Custom page requires the following steps:
  Tue> odbedit
  [local:midas:Stopped]/>ls
  System
  Programs
  Experiment
  Logger
  Runinfo
  Alarms
  Equipment
  [local:midas:Stopped]/>mkdir Custom
  [local:midas:Stopped]/>cd Custom/
  [local:midas:Stopped]/Custom>import mcustom.html
  Key name: Test&
  [local:midas:Stopped]/Custom>
  Tue> odbedit
  [local:midas:Stopped]/>cd Custom/
  [local:midas:Stopped]/Custom>export test&
  File name: mcustom.html
  [local:midas:Stopped]/Custom>
<!doctype html public "-//w3c//dtd html 4.0 transitional//en">
<html>
 <head>
 <meta http-equiv="Content-Type" content="text/html; charset=iso-8859-1">
 <meta name="GENERATOR" content="Mozilla/4.76 [en] (Windows NT 5.0; U) [Netscape]">
 <meta name="Author" content="Pierre-André Amaudruz">
 <title>Set value</title>
 </head>
 <body text="#000000" bgcolor="#FFFFCC" link="#FF0000" vlink="#800080" alink="#0000FF">
 <form method="GET" action="http://host.domain:port/CS/WebLtno&">
 <input type=hidden name=exp value="ltno">
  <center><table CELLSPACING=0 CELLPADDING=0 COLS=3 WIDTH="100%" BGCOLOR="#99FF99" >
  <caption><b><font face="Georgia"><font color="#000099"><font size=+2>LTNO
     Custom Web Page</font></font></font></b></caption>
  <tr BGCOLOR="#FFCC99">
  <td><b><font color="#FF0000">Actions: </font></b>
  <input type=submit name=cmd value=Status>
  <input type=submit name=cmd value=Start>
  <input type=submit name=cmd value=Stop>
  <td>
  <input type=submit name=cmd value=ODB>
  <input type=submit name=cmd value=History>
  <input type=submit name=cmd value=Elog></td>
  <td><div align=right><b>LTNO experiment </b></div>
  </td></tr>
  <tr><td><b>Cryostat section:</b>
  <br>LN2 Bath Level : <odb src="/equipment/cryostat/variables/measured[12]">
  <br>Run# : <odb src="/runinfo/run number" edit=1>
  <br>Run#: <odb src="/runinfo/run number"></td>
  <td WIDTH="100%" BGCOLOR="#009900"><b>RF source section:</b>
  <br>Run#: <odb src="/runinfo/run number"></td>
  <td WIDTH="50%" BGCOLOR="#FF6600"><b>Run section:</b>
  <br>Start Time: <odb src="/runinfo/start time">
  <br>Stop Time: <odb src="/runinfo/stop time">
  <br>Run#: <odb src="/runinfo/run number"></td>
  </tr>
  <tr>
  <td BGCOLOR="#CC6600"><b>Sucon magnet section:</b>
  <br>Run#: <odb src="/runinfo/run number"></td>

  <td BGCOLOR="#FFCC33"><b>Scalers section:</b>
  <br>Beam Current: <odb src="/equipment/epics/variables/measured[10]">
  <br>Run#: <odb src="/runinfo/run number"></td>

  <td BGCOLOR="#66FFFF"><b>Polarity section:</b>
  <br>Run#: <odb src="/runinfo/run number"></td>
  </tr>
  </table></center>

  <img src="http://host.domain:port/HS/Meterdis.gif?exp=ltno&scale=12h&width=400">
  <img src="http://host.domain:port/HS/Bridge.gif?exp=ltno&scale=12h&width=400">
  <b><i><font color="#000099"><a href="http://host.domain/index.html">
  <br> LTNO help</a></font></i></b>
  </body>
</html>
In the case the custom web page is rather large and complex, it becomes easier to handle such file through normal html editor and skip the reloading of the file in the ODB. (import/export). This is now possible by providing an external reference of the web page in the /Custom directory of the ODB. In addition special ODB settings are available to allow GIF image insertion and ODB fields bars and fillup area superimposed on the image. This powerful new extention brings the mhttpd capability closer to other experiment web control similar to EPICS.
The HTML examples below should operate in conjunction of the standard demo midas example found in midas/examples/experiment. myexpt.html, xcumstom.odb and myexpt.gif can be found in the midas/examples/custom directory.
Using your favorite html editor, you can create a custom page including any of the options described in the Internal HTML document.. Once the mhttpd application is started and connected to a valid Midas experiment, you can activate this page as follow:
[local:Default:Stopped]/>pwd
/
[local:Default:Stopped]/>mkdir Custom
[local:Default:Stopped]/>cd Custom
[local:Default:Stopped]/Custom>create string Dewpoint&
String length [32]: 256
[local:Default:Stopped]/Custom>set Dewpoint& \doc\cooling\dewpoint.html
Note: This link refers to a local html document. In the case an external HTML is requires, the definition should be placed under /Alias (see also ODB /Alias Tree).
[local:Default:Stopped]/>mkdir Alias
[local:Default:Stopped]/>cd alias
[local:Default:Stopped]/alias>create string WebDewpoint&
String length [32]: 256
[local:Default:Stopped]/alias>set WebDewpoint& "http://www.decatur.de/javascript/dew/index.html"
After refreshing the Midas status web page, the link Dewpoint should be visible in the top area of the page. The "&" is to prevent a new frame to be displayed (see ODB /Alias Tree). Clicking on it will bring you to your custom html documentation. In the case you want to extend the flexibility of your page by including features such as:
Html document myexpt.html
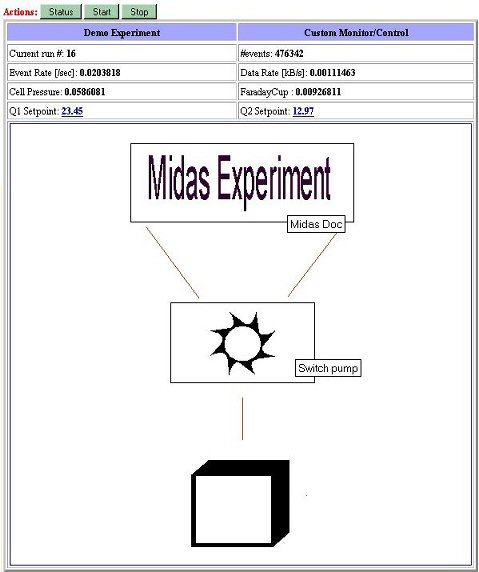
<html> <head> <title>MyExperiment Demo Status</title> <meta http-equiv="Refresh" content="30"> </head> <body> <form name="form1" method="Get" action="/CS/MyExpt&"> <table border=3 cellpadding=2> <tr><th bgcolor="#A0A0FF">Demo Experiment<th bgcolor="#A0A0FF">Custom Monitor/Control</tr> <tr><td> <b><font color="#ff0000">Actions: </font></b><input value="Status" name="cmd" type="submit"> <input type="submit" name="cmd" value="Start"><input type="submit" name="cmd" value="Stop"> </td><td> <center> <a href="http://midas.triumf.ca/doc/html/index.html"> Help </a></center> </td></tr> <td>Current run #: <b><odb src="/Runinfo/run number"></b></td> <td>#events: <b><odb src="/Equipment/Trigger/Statistics/Events sent"></b></td> </tr><tr> <td>Event Rate [/sec]: <b><odb src="/Equipment/Trigger/Statistics/Events per sec."></b></td> <td>Data Rate [kB/s]: <b><odb src="/Equipment/Trigger/Statistics/kBytes per sec."></b></td> </tr><tr> <td>Cell Pressure: <b><odb src="/Equipment/NewEpics/Variables/CellPressure"></b></td> <td>FaradayCup : <b><odb src="/Equipment/NewEpics/Variables/ChargeFaradayCup"></b></td> </tr><tr> <td>Q1 Setpoint: <b><odb src="/Equipment/NewEpics/Variables/EpicsVars[17]" edit=1></b></td> <td>Q2 Setpoint: <b><odb src="/Equipment/NewEpics/Variables/EpicsVars[19]" edit=1></b></td> </tr><tr> <th> <img src="http://localhost:8080/HS/Default/Trigger%20rate.gif? exp=default&scale=12h&width=250"> </th> <th> <img src="http://localhost:8080/HS/Default/Scaler%20rate.gif? exp=default&scale=10m&width=250"></th> </tr> <tr><td colspan=2> <map name="myexpt.map"> <area shape=rect coords="140,70, 420,170" href="http://midas.triumf.ca/doc/html/index.html" title="Midas Doc"> <area shape=rect coords="200,200,400,400" href="http://localhost:8080" title="Switch pump"> <area shape=rect coords="230,515,325,600" href="http://localhost:8080" title="Logger in color level (using Fill)"> <img src="myexpt.gif" border=1 usemap="#myexpt.map"> </map> </td></tr> </table></form> </body> </html>
To activate this HTML document, it has to be defined in the ODB as follow:
[local:Default:Stopped]/>cd /Custom
[local:Default:Stopped]/Custom>create string Myexpt&
String length [32]: 256
[local:Default:Stopped]/Custom>set Myexpt& \midas\examples\custom\myexpt.html
After refresh, the ODB values will be displayed, the mapping is still not active. as no reference to the gif location has been given yet.
[local:Default:Stopped]/Custom>mkdir Images
[local:Default:Stopped]/Custom>cd Images/
[local:Default:Stopped]Images>mkdir myexpt.gif
[local:Default:Stopped]Images>cd myexpt.gif/
[local:Default:Stopped]myexpt.gif>create string Background
String length [32]: 256
[local:Default:Stopped]myexpt.gif>set Background \midas\examples\custom\myexpt.gif
After refresh, the file myexpt.gif should by visible. The mapping based on myexpt.map is active, hovering the mouse over the boxes will display the associated titles (Midas Doc, Switch pump, etc), By clicking on either box the browser will go to the defined html page specified by the map.
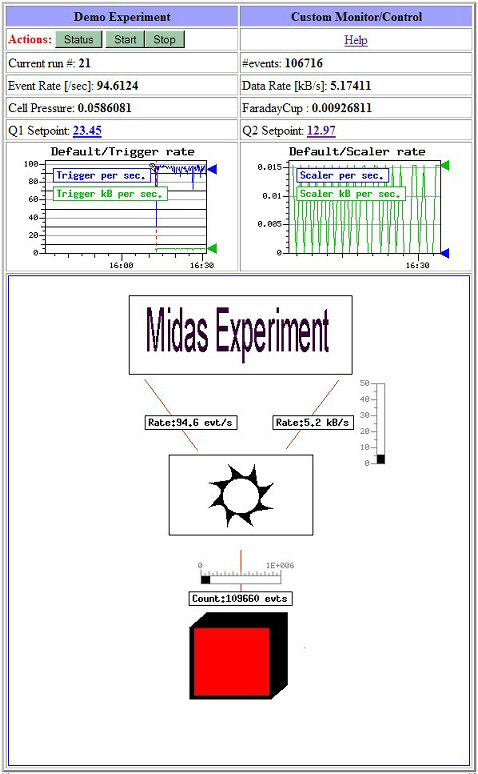
In addition of these initial features, multiple ODB values can be superimposed at define location on the image. Each entry will have a ODB tree associated to it defining the ODB variable, X/Y position, color, etc...
[local:Default:Stopped]myexpt.gif>mkdir Labels
[local:Default:Stopped]myexpt.gif>cd labels
[local:Default:Stopped]Labels>mkdir Rate

>>>>>>>> Refresh web page <<<<<<<<

12:32:38 [mhttpd] [mhttpd.c:5508:show_custom_gif] Empty Src key for label "Rate"
Creating "Labels/<label name>" sub-directory under the gif file name, will automatically at the next web page refresh complete its filling with default value for the structure for that label.
[local:Default:Stopped]Labels>cd Rate/
[local:Default:Stopped]Rate>ls -l
Key name                        Type    #Val  Size  Last Opn Mode Value
---------------------------------------------------------------------------
Src                             STRING  1     256   2m   0   RWD
Format                          STRING  1     32    2m   0   RWD  %1.1f
Font                            STRING  1     32    2m   0   RWD  Medium
X                               INT     1     4     2m   0   RWD  0
Y                               INT     1     4     2m   0   RWD  0
Align                           INT     1     4     2m   0   RWD  0
FGColor                         STRING  1     8     2m   0   RWD  000000
BGColor                         STRING  1     8     2m   0   RWD  FFFFFF
The Src should point to a valid ODB Key variable. The X,Y fields position the top left corner of the label. The other fields associated to this label are self-explanatory.
[local:Default:Stopped]Rate>set src "/Equipment/Trigger/statistics/kbytes per sec."
[local:Default:Stopped]Rate>set x 330
[local:Default:Stopped]Rate>set y 250
[local:Default:Stopped]Rate>set format "Rate:%1.1f kB/s"
Once the initial label is created, the simplest way to extent to multiple labels is to copy the existing label sub-tree and modify the label parameters.
[local:Default:Stopped]Labels>cd ..
[local:Default:Stopped]Labels>copy Rate Event
[local:Default:Stopped]Labels>cd Events/
[local:Default:Stopped]Event>set src "/Equipment/Trigger/statistics/events per sec."
[local:Default:Stopped]Event>set Format "Rate:%1.1f evt/s"
[local:Default:Stopped]Event>set y 170
[local:Default:Stopped]Event>set x 250
In the same manner, you can create bars used for level representation. This code will setup two ODB values defined by the fields src.
[local:Default:Stopped]myexpt.gif>pwd
/Custom/Images/myexpt.gif
[local:Default:Stopped]myexpt.gif>mkdir Bars
[local:Default:Stopped]myexpt.gif>cd bars/
[local:Default:Stopped]Labels>mkdir Rate

>>>>>>>> Refresh web page <<<<<<<<

14:05:58 [mhttpd] [mhttpd.c:5508:show_custom_gif] Empty Src key for bars "Rate"
[local:Default:Stopped]Labels>cd Rate/
[local:Default:Stopped]Rate>set src "/Equipment/Trigger/statistics/kbytes per sec."
[local:Default:Stopped]Rate>set x 4640

[local:Default:Stopped]Rate>set y 210
[local:Default:Stopped]Rate>set max 1e6
[local:Default:Stopped]Labels>cd ..
[local:Default:Stopped]Labels>copy Rate Events
[local:Default:Stopped]Labels>cd Events/
[local:Default:Stopped]Event>set src "/logger/channles/0/statistics/events written"
[local:Default:Stopped]Event>set direction 1
[local:Default:Stopped]Event>set y 240
[local:Default:Stopped]Event>set x 450
[local:Default:Stopped]Rate>set max 1e6
Following the same principle as for the labels, by creating Bars/<bar name>, the structure for the rate will be filled with a default setting after refreshing the custom midas page. The different parameters are self-explanatory.
The last option available is the Fills where an area can be filled with different colors depending on the given ODB value (src parameter). The color selection is mapped by correspondance of the index of the Limit array to the Fillcolor array. Presently the structure is not pre-defined and need to be entered by hand.
[/Custom/Images/myexpt.gif/Fills/Level]
Src = STRING : [256] /equipment/Trigger/statistics/events sent
X = INT : 250
Y = INT : 550
Limits = DOUBLE[4] :
[0] 0
[1] 10
[2] 10000
[3] 100000
Fillcolors = STRING[4] :
[8] 00FF00
[8] AAFF00
[8] AA0000
[8] FF0000
To be noted that <script> language within the .html source file is possible.
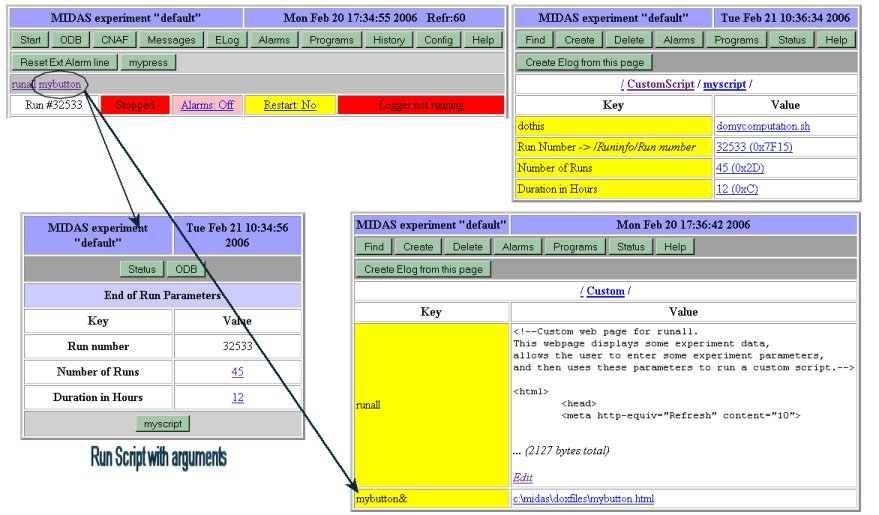
In order to provide a new frame holding input parameters with start script button using the inputs parameters as arguments the setup is the following:
These operations will implement a new button <mybutton> in the main Status Midas web page (same lne as alias). By clicking <mybutton> a new frame will be created as described in the mybutton.html. By clicking on the <myscript> of tht new frame, execution of the script using all the argument above will be performed.
<!--Custom web page for runall.
This webpage displays some experiment data,
allows the user to enter some experiment parameters,
and then uses these parameters to run a custom script.-->

<html>
        <head>
        <meta http-equiv="Refresh" content="10">
        <title>RUNALL</title>
        </head>

        <body>
        <form method="GET" action="http://<host>:<port>/CS/mybutton&">
        <input type=hidden name=exp value="default">

        <table border ="3" cellpadding ="5" width ="40%">
        <tr align ="center"<th bgcolor =#A0A0FF>
        MIDAS experiment "default"</th>
        <th bgcolor =#A0A0FF>

 <script>
        var mydate=new Date()
        var year=mydate.getYear()
        if (year < 1000)
          year+=1900
        var day=mydate.getDay()
        var month=mydate.getMonth()
        var daym=mydate.getDate()
        var hour=mydate.getHours()
        var min=mydate.getMinutes()
        var sec=mydate.getSeconds()
        if (daym<10)
          daym="0"+daym
        if (hour<10)
          hour="0"+hour
        if (min<10)
          min="0"+min
        if (sec<10)
          sec="0"+sec
        var dayarray=new Array("Sun","Mon","Tue","Wed","Thur","Fri","Sat")
        var montharray=new Array("Jan","Feb","Mar","Apr","May","June","July",
        "Aug","Sept","Oct","Nov","Dec")
        document.writeln(dayarray[day], " ", montharray[month], " ", daym," ",
        hour, ":", min, ":", sec," ", year);
        </script>
  </th>
  </tr>

        <tr align ="center"<th colspan ="2" bgcolor=#A0A0A0>
        <input type=submit name=cmd value=Status>
        <input type=submit name=cmd value=ODB></th></tr>
        <tr align ="center"><th colspan = "2" bgcolor=#CCCCFF>
        End of Run Parameters</th></tr>
        <tr align ="center"><th> Key </th>  <th>Value </th></tr>
        <tr align ="center"><td><b>Run number</b></td>
        <td><odb src="/runinfo/run number"></td></tr>
        <tr align ="center"><td><b>Number of Runs</b></td>
        <td><odb src="/customscript/myscript/Number of Runs" edit=1></td></tr>
        <tr align ="center"><td><b>Duration in Hours</b></td>
        <td><odb src="/customscript/myscript/Duration in Hours" edit=1></td></tr>
        <tr align ="center"<th colspan ="2" bgcolor=#D0D0D0>
        <input type=submit name=customscript value="myscript">
        </th></tr>
        </table>
        </form>
        </body>
</html>
Utilities - Top - Data format