The Oxford Instruments VARIOX cryostats are used on the GPD and DOLLY MuSR instruments. They can be used as usual so-called static helium-flow cryostat with a sample stick insert.
They can be also used in combination with the HELIOX insert, which is an 3He sorbtion pump system.
Using the Variox cryostat alone
On the DOLLY instrument:
On the DOLLY instrument, the temperature of the Variox cryostat is controlled by a standard Lakeshore 340 temperature controller. The needle-valve of the cryostat is controlled by a RVC300 controller reading the actual value of the helium flow. The needed helium-flow setpoint is determined by a separated "Flow Control" front-end which can either calculate the flow automatically or use a given setpoint. See the available "Quick References DOLLY".
On the GPD instrument:
On the GPD instrument, the Variox cryostat is controlled by a LabView application running on a PC located near the instrument. In turn this LabView application can be controlled by the deltat GUI through a MIDAS front-end. When using the Variox cryostat alone, the MIDAS front-end and LabView application should be configured accordingly (see section Configuring the MIDAS front-end).
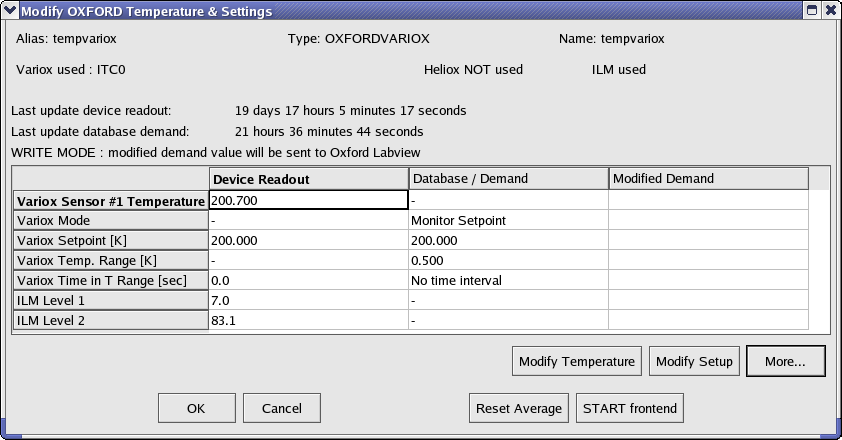
Usually, the user can set the temperature of the Variox and read the cryogenic levels.
If the tab Modify Devices is selected a list of the available devices will appear. The Variox/Heliox Cryostat can be selected and a button Modify will be available.
By hitting the button Modify, a first dialog appears giving the possibility either to change the setpoint (Modify Temperature).
If the checkbox Update Title is active, the temperature setpoint in the title of the run will be updated by the present temperature controller when a new setpoint is choosen. Also the temperature average values calculated by the present temperature controller will be written in the header of the run (if correctly set in the MIDAS database – usually done by the Instrument Scientist). Note that the user should ensure that no other temperature controller will update the run title.
OK.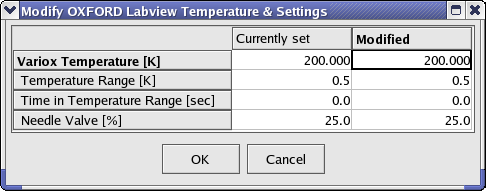
- Note:
- When using the Variox cryostat alone on GPD, the Variox setpoint changes the temperature of the Variox IVC. In addition, the sample stick is equipped with a temperature control loop (sensor and heater) which can be controlled by a LTC20/21 controller or a LakeShore 340 controller. Therefore to change the sample temperature, the Variox setpoint should be changed as well as the setpoint of the sample stick through the corresponding device controlling the stick. Of course the same temperature should be set for both setpoints.
Using the Variox cryostat with Heliox insert
When using the Variox cryostat with the Heliox, the MIDAS front-end and LabView application should be configured accordingly (see see section Configuring the MIDAS front-end).
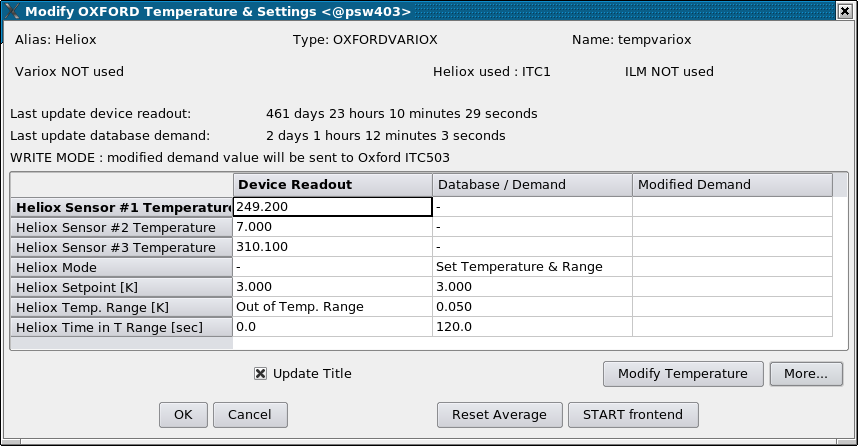
Usually, and after the condensation of the 3He liquid, the Variox is kept at the lowest temperature (using the Lakeshore temperature controller on DOLLY or through the LabView application on GPD) and solely the temperature of the Heliox is changed from the deltat GUI application (the possibility to change the Variox setpoint from deltat beeing disabled on the GPD instrument).
If the tab Modify Devices is selected a list of the available devices will appear. The Variox/Heliox Cryostat can be selected and a button Modify will be available.
By hitting the button Modify, a first dialog appears giving the possibility to change the setpoint (Modify Temperature).
If the checkbox Update Title is active, the temperature setpoint in the title of the run will be updated by the present temperature controller when a new setpoint is choosen. Also the temperature average values calculated by the present temperature controller will be written in the header of the run (if correctly set in the MIDAS database – usually done by the Instrument Scientist). Note that the user should ensure that no other temperature controller will update the run title.
OK.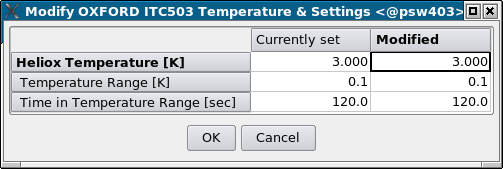
Configuring the MIDAS front-end
The Oxford Instrument LabView application controls the Heliox insert and also the Variox cryostat on the GPD instrument. This application controls the needed temperature controllers (ITC 503's). During normal operation, the user controls the temperature of the cryostat and/or insert through a MIDAS fron-end process, which communicates with the LabView application. This MIDAS front-end is fully integrated into the deltat GUI application.
Prior to control the Varix/Heliox system, the LabView application should be setup correctly and ready to communicate with the MIDAS front-end.
Ask the instrument scientist for advices.
Notes for the instrument scientist:
- The MIDAS front-end should be first configured to reflect the hardware used (Variox and/or Heliox). This is done by changing the values of some variables in the ODB:
/Equipment/tempvariox/Settings/Devices/OXFORDVARIOXout/DD/ITC Variox Used/Equipment/tempvariox/Settings/Devices/OXFORDVARIOXout/DD/ITC Heliox Used
This can be performed either withodbeditor through the WEB interface, by looking at the tree:
- GPD:
http://psw404:8081/Equipment/tempvariox/Settings/Devices/OXFORDVARIOXout/DD - DOLLY:
http://psw403:8081/Equipment/tempvariox/Settings/Devices/OXFORDVARIOXout/DD
- The MIDAS front-end should then be configured to reflect the setpoints which can be changed by the MIDAS front-end. This is done by changing the values of some variables in the ODB:
/Equipment/tempvariox/Variables/Output[30]/Equipment/tempvariox/Variables/Output[31]
This can be performed either withodbeditor through the WEB interface, by looking at the tree:
- GPD:
http://psw404:8081/Equipment/tempvariox/Variables - DOLLY:
http://psw403:8081/Equipment/tempvariox/Variables
Alternatively, one can change these values through the WEB interface, by looking at the tree:
TheOutput[30]andOutput[31]variables correspond to the variablesITC_Variox_Setpoint_UsedandITC_Heliox_Setpoint_Used, respectively